Menu Home About Tutorials Style Shop Buttons

Monday, August 30, 2010

Refashion #7 Lace t-shirt and a giveaway!

On our recent Disneyland trip we stopped at an outlet mall in Nevada. I found this shirt at Charlotte-Russe for $3. While I bought two yellow shirts to make a tone on tone refashion (coming up later) I only bought one in this color so I could embellish it with something else. I began by cutting a 20 inch strip of lace from a bolt I had. I cut it in half lengthwise because it was pretty wide.

I used my sewing machine to stitch down the edge of the lace. I pulled the bottom thread and gathered the lace to create a flower. (It helps to wrap it around your finger).


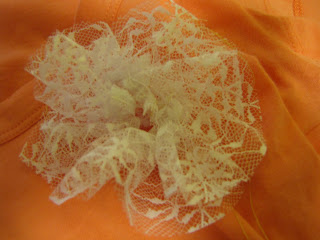
I cut the second half of the lace in half again to make 2 smaller peices. One is scalloped, the other is straight, which creates two different flowers.


I used the same method to make 2 smaller flowers.


Next, I cut small strips of ribbon and folded them as shown above.

I hand sewed the flower and the ribbon to one side of the neckline of the shirt. (I didn't even glue!)


Ta da! It is a little "floofy" but I think it's cute.


I wore it with this fabulous gold flower necklace, but it slipped under the shirt for the picture so you can't see it. I am also wearing skinny jeans and gold flats. I think it makes a cute outfit.


Like the look but don't want to make the flowers yourself? Well, you are in luck! You have two ways to obtain a lace flower pin you can add to t-shirts, cardigans, scarves, etc.


#1 Win this flower.

Leave a comment below to enter. You MUST be (or become) a follower of Yellow Blackbird to win. Please leave an email address if it is not accessible in your profile. Only one entry per person please! The contest will be open for 1 week. Entries must be submitted by Monday night at 11:59 pm MST. The winner will be chosen on Tuesday, September 7th. The winner will have 24 hours to answer my email or another winner will be chosen. Good luck!


#2 Purchase this flower in my shop.
Click HERE to buy.
Thanks to Dorian for the blog award!

This post will be linked up to the following parties. Click HERE to see their buttons and other parties I regularly link to.

I Made the World Cuter
It's So Very Cheri
Just Something I Whipped Up Monday

Thursday, August 26, 2010

Fashion Show Results

Thank you so much for your kind and helpful comments regarding my fashion show dilemma. It seemed the majority liked the yellow and gray Old Navy cardigan so I chose it.
I did change to a gray belt. The fashion show was really not a big deal. I was on stage for about 20 seconds it seemed so I could have worn anything! :)

I am not the kind of girl to get up there and strut my stuff but my husband did trick me in to taking this silly photo.

The biggest problem was knowing what shoes to wear after I switched to the gray belt.

Here were my choices:


I went with these American Eagle shoes from Payless. The peep toe made the outfit look slightly more summery, and the bow was a cute detail. The heel was low enough I could walk and not trip!

I really love putting outfits together. It is another way to express creativity, don't you think? I might be a little too obsessed with clothes, though.

Thank for helping!

Wednesday, August 25, 2010

Back to School (cupcakes)

First off, thanks so much for all of the comments on my fashion show outfit! I really appreciate it! There has been some great advice. I have to leave in 30 minutes and haven't made the final decision yet but I will let you know tomorrow!!!

Really quickly I wanted to share these ADORABLE apple cupcakes with you. My cute sister-in-law made them for my husband and me as good luck for our first day of school. (We are both teachers.) Such a great idea! They would be fun to use for your kids, as a room mom, etc.

They are chocolate cupcakes with red frosting.
It looks like the frosting has red sprinkes.


The stem is a Tootsie Roll and the leaf is made of frosting.


They are soooo delicious! Thanks Sus and Dan!!


Tuesday, August 24, 2010

Fashion Show- I need your help!

Tomorrow night (Wednesday) the women at my church are having a mother daughter modest fashion show. They have asked me to be in it. I will take that as a compliment that they think my clothes are cute, but I don't know what to wear! I am supposed to wear something in the cateogry of "wear to work" or business clothes.

I have narrowed it down to two outfits. What do you think? Please comment below and let me know which you think I should wear.

#1 Old Navy cardigan, Wet Seal dress pants, gold flats, gray skinny belt, and gold flower statement necklace from Charlotte Ruse
#2
Old Navy cardigan, same pants, pear necklace, Steve Madden wedges, black belt.

I don't know if I like the black belt with this.

I could wear either of these with black pants, black, gray, or white belts, and a myriad of shoes. I don't want to wear heels because I don't know what kind of walking this entails and I would hate to fall on my face!

The fashion show is tomorrow night so any comments now would be great. I think I am leaning towards #1 but my husand votes for #2.

Remember: If you don't have something nice to say- don't say anything at all!!

I will be linking up to "What I Wore Wednesday" at the Pleated Poppy so I can get some more opinions.

Thanks, friends!


Saturday, August 21, 2010

I went boating

I was about to post a tutorial for my next shirt refashion when some friends called and asked us to go boating.

I went boating.

Sorry.

(I'll get it up at the beginning of next week!)

Tuesday, August 17, 2010

Halloween Headbands


Celebrate Halloween in style with this festive Halloween headband!

If you are not a fan of the lace, you can request that your headband come lace free! : )


This headband is great for Halloween parties, family get-togethers, or taking the kids trick-or-treating if you don't want to wear a costume. It is perfect for the Sunday Halloween we have this year if you wear your costume on Saturday night but still want to be festive on the actual holiday. This would also make a great and unique gift for a September or October birthday.


The headband is $12 with a shipping cost of $2.50. It will arrive carefully packaged wrapped in tissue paper inside a sturdy box. This is a limited edition design- only four will be created.


Click HERE to see it in my shop!
Thanks for allowing the shameless self-promotion! If you are not intersted in purchasing I at least hope you are inspired!
School is about to start so I am back to work full-time. Unfortunately this means that my blogging time is limited. But do not despair! I will still be sharing fun tutorials and more!
Thanks for reading and following! You are the best!

Saturday, August 14, 2010

Refashion #6 Anthro Inspired Blouse

While browsing the Anthropologie website I saw this blouse (Perdita) (below) and thought it was such a great take on a standard button front shirt. It is business-like, but fun and feminine at the same time.


I found this pink striped Old Navy shirt in my closet. I have had it for years. It's cute and still in good condition, but I don't wear it much. Do you ever just get bored of a shirt after a long time?


I knew the Anthro blouse was the ticket to revitilizing this shirt.


I gathered fabrics that matched the shirt. It has light pink, maroon, and a dark color that could be gray or brown. I chose to use both so the shirt would go with both my gray and my brown boots this fall!


I made a variety of flowers from the fabrics.


The popular rolled rosettes of course had to go on my shirt. The pink ones are made from a pillowcase (just like this necklace), the gray from a t-shirt, and the stripe from JoAnn fabric I bought just for this project.


These roses were made by cutting long 1" wide strips of shiny smooth polyester fabric. I melted the edges of the fabric with a candle. I then stitched a basting stitch (is that what it is called?) down the edge of each strip. I pulled the thread to gather the fabric, then rolled up the fabric to create the flower.


This flower was designed using the same technique as above but with cotton fabric so I didn't burn the edges. It just frays.


This brown flower was made by folding circles of fabric into fourths and stitching the points together. Mine turned out pretty uneven so I hid it under some of the other flowers.


Finally, I cut geometric shapes from the gray t-shirt of varying sizes and stacked them on top of each other. It looked too much like sweat pants, so I added a pink pearl to the center. (I also used similar flowers on another shirt refashion.)


The final flower collection:


I played around for quite awhile with the placement of the flowers. I had to decide what to do about the pocket, collar, and how close to put the flowers to the buttons. The Anthro shirt had more flowers and even strips of fabric (ribbon?) but I wanted to start simple. If I feel like it later I can always add more.


I changed from this arrangement and moved the flowers up higher as to not cover the pocket.


I attached the flowers using fabric glue but sewing might be better.


Ta da! My old shirt is now fun and fresh! I can't wait to wear it. I am thinking this shirt, skinny jeans with boots and a fabulous jacket will make a great fall outfit!


I am very excited about this shirt so it will be linked up to many of my favorite linky parties!


Saturday:
Tatertots and Jello

Monday:
It's So Very Cheri
I Heart Naptime
Making the World Cuter

Tuesday:
Hope Studios
Today's Creative Blog

Wednesday:
Someday Crafts
Tea Rose Home
Blue Cricket Designs


Thursday, August 12, 2010

Disney Week: Magical Birthday Card

This is a project that I did back in June for card club (which I am no longer a part of so I won't have any more card club cards to show you). I don't think it is fabulous and it is very simple so I never posted, but it fits with the theme of this week so here ya go!

First, you need to make your Mickey. I used a hole punch to cut the large circle and a stencil for the small ones. Remember that if Mickeys head is the size of a quarter, his ears should be a dime.


I used a variety of colorful papers that reminded me of a party.


Cut your cards from cardstock.


Cut a peice of your patterned paper that is about 1/4" smaller than the card on all sides.


I downloaded a Disney font HERE and typed the phrase "Have a Magical Birthday" in Word. I printed it off and cut it out the size I wanted.


You could add more detail to make it more fun and more "crafty." I had to make 12 of these cards so I kept them simple.


I hope you have enjoyed my little Disney week! Feel free to add your own tips in the comment section of any post. Also, if you have a Disney post of your own, add a link in the comments so that others can see what you have done.

Wednesday, August 11, 2010

Disney Week: Mickey Headband Tutorial

As I mentioned in an earlier Disney Week post, Disney merchandise in the park can be expensive! I wanted something fun I could wear on my trip that wouldn't cost hardly anything. I decided to make my own Micky Mouse headband!


First, I created the ever popular rosettes out of a $1 t-shirt I bought for projects such as this. I like the t-shirt material for this project because I think the circles look less like flowers.


Make one large circle for the head and two smaller circles for the ears. (The artist in the Animation Studio at the park said that if the head is a quarter the ears should be dimes. I think my ears could have been a little bigger.)


This is plain Mickey but you could jazz it up if you want.


You can add some bling.


I also think it would be so cute to add ribbon and make Minnie Mouse.


(Sorry for the sideways picture. Some of my pictures lately are just doing that I don't know what the problem is.)


I decided to stick with just a plain Mickey. Glue the rosettes on a piece of felt to look like Mickey. Cut out around the Mickey shape.


Attach it to the headband with hot glue. Then put a small piece of felt over the back to finish it off.


This is the best picture I have from the trip of me wearing the headband.


Not a good photo, I know.


These Mickeys could also be used as hair clips, or attached to t-shirts or tote bags for your Disney trip. I think they would make really cute and unique gifts for little girls (especially Minnie Mouse).


Come back tomorrow to see my last Disney project. Then return this weekend for another shirt refashion!


This post will be linked to:

Hope Studios
Blue Cricket
Tea Rose Home

Click HERE to see their buttons and other parties I regularly participate in!


©2011 All Rights Reserved | Website Designed by Website Design Credit

Powered by Blogger