Menu Home About Tutorials Style Shop Buttons

Monday, February 13, 2012

Origami Heart Valentines


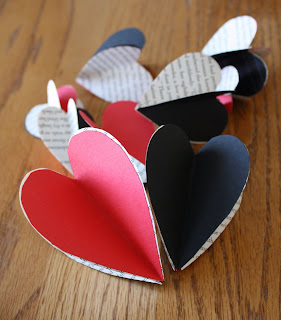
Hi Friends! Just dropping in to share my last minute Valentines. While I planned on making cookies (red velvet mmmm....) for our parents and siblings for Valentine's Day, I didn't think I would be doing anything else. Then I saw this adorable video tutorial on how to make origami heart Valentine's. I shared it with my Facebook followers the other day, then decided to make a few myself for my friends at work. It only took a few minutes using my scraps of leftover Valentine scrapbook paper and stickers from past projects to make these. They are so cute! Just don't be too jealous of my mad night time last minute photography skills!


I hope you have a great Valentines day. It's going to be epic over here.
Monday, January 23, 2012

Book Page Valentines

I don't really have any plans this year to make Valentine's Day crafts. It doesn't fit into my plans for the holiday (which are epic, just not heart themed). So instead I am sharing all the book page crafts I made last year, in case you forgot about them or are new here. Enjoy! : )


Saturday, February 12, 2011

Valentines Table Setting

I have finished all my Valentines book page decor and have my table all set for my dinner party tomorrow. We are having both sets of parents over. I still have a brother at home so of course he is invited too.


It may not be the fanciest thing ever, but I am very pleased!


Links to all the book page crafts:
Happy Valentines Day! Do you have big plans? We have a gift card for Macaroni Grill so we'll be going there on Monday. I have had a hard time figuring out what to do for my husband. I actually had a GREAT idea for a card, but don't know if I will finish it. Maybe next year. Once, right before Valentines Day, I saw the cutest idea for a Valentine that used old school Nintendo controllers and said "Will You Be My Player 2?" I knew that was the perfect Valentine for Spencer who loves Nintendo, so I saved the materials for an entire year and made a card for the next Valentines day.

Two Book Page Hearts

I have 2 more book page Valentine projects to share. They are pretty easy so I didn't include full tutorials, but I have given suggestions.


First, we'll take a look at these book page hearts that I hung from my chandelier.


Second, I'll show you these 3D paper hearts I used for a center piece.


You have probably seen hearts made from strips of paper before- it's not a novel idea. You just need two strips of paper that are the same size and a stapler.


Stack the papers on top of each other, staple the bottoms together. Then pull the papers around to make a heart shape and staple at the other end.

You can add strips of varying lengths to create hearts with multiple layers.

These are all the hearts I made.


I tied them to the chandelier with thread.


Next, are the book page 3D hearts. Also simple. Cut as many hearts as you like that are all the same size. I used four hearts. Fold each heart in half. Glue the sides of each heart to another heart. Open up and viola!


I put my hearts in a simple glass vase for a center peice, but the jar seemed too short for the table.

I found this glass bowl in my cupboard that was the same size as the jar.

I sat the jar on the bowl and it looks like a fancy vase!


I'll be putting two candles on either side.


Come back later and I will show you my finished table setting!
Happy Valentines Weekend!

Wednesday, February 9, 2011

Valentines Book Page Flower Tutorial

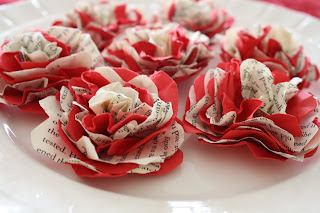
As part of my book page Valentines Day decor I made these lovely paper flowers. Aren't they so pretty?

All of the credit for the following tutorial goes to Dawn at Dawn's Stamping Thoughts.


First, cut eight flower shapes from your paper. I did four out of cardstock and 4 out of a book page. I punched circles and then scalloped the edges by hand to make the flower shapes.

If you are using cardstock, spray it lightly with water so it is more pliable. (You may want to use a paper towel so they color doesn't bleed onto your counter top. Just sayin'.)

Crumple each flower shape, then smooth it back out.

Stack each flower onto a brad. Be sure to start with the paper you want in the middle of the flower. I started with a book page and then alternated with the red cardstock.

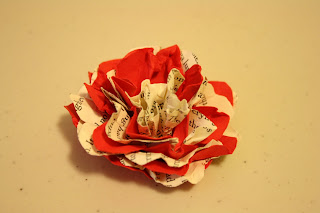
Close the brad and it should now look like this.

Starting with the top layer, squish the paper around the brad in the center.

Continue for each layer until the entire flower is scrunched together.

Now flatten the petals back out just slightly until the flower takes the shape you want it to. If you have used wet cardstock, it will harden nicely into the shape when it dries.


I made 7 flowers and will be putting one on each person's plate at my Valentines dinner.


I still have 2 more book page Valentines crafts to post. I made book page hearts to hang from my chandelier and some 3-D book page and cardstock hearts for the center piece. If you haven't seen my garland yet, click here to check it out!

Saturday, January 22, 2011

Valentine's Book Page Garland

I love the trend of crafting with book pages. I am not usually into Valentine's decor but thought it went well these book page pinwheels. (Scroll to the end to see the entire garland).

First, take 2 pages from an old book and cut them to the same size.


Stack the pages on top of each other and accordion fold about 1 inch (or any size you want).


Pull the pages apart to use them separately.


Stack the 2 folded up papers on top of each other and secure with a small piece of wire around the middle.


Open the paper into a pinwheel and glue all 4 of the open sides together.
(After finishing this garland I found this tutorial for an adorable project that also uses these wheels. Follow the instructions in the video to use double stick tape instead of wire.)


By the way I am very impressed with myself for this photo.


The wheel looks like this when finished.


Now embellish as desired. I cut out a black circle from cardstock and a heart from some metallic red paper. I used 7 wheels total.


I then glued all of the wheels vertically onto a thin black ribbon. (Three wheels on one ribbon and two each on the other two ribbons. If that is confusing just look at the pictures below.)

I cut out another cardstock circle to glue to the back over the ribbon to make the wheel a little sturdier.

As seen below, I looped the ribbons over a curtain rod. I didn't want to tie knots so I used alligator clips to secure it. The clips are hidden behind the wheels so you can't tell that they are there.


BACK:


FRONT:


The finished product! It is hanging in my dining room window. It's not huge or showy but bring some Valentine's Day love to the room (although it really is kind of early for V day stuff...).


I think they would look cute hanging horizontally too. The wheels could be decorated to fit any holiday or theme.

If you make one I would love to see it! Email me aubreelarsen@gmail.com.


©2011 All Rights Reserved | Website Designed by Website Design Credit

Powered by Blogger