Menu Home About Tutorials Style Shop Buttons

Friday, July 22, 2011

Bracelet Week: Stacking

In this addendum to Bracelet Week I want to explore the trend of bracelet stacking. I really love it!

(photo from Glam Shop Online. These bracelets are only $8.50 with free shipping!)

I've been looking around the web for info, tips, and advice on bracelet stacking. It seems that there's only one rule for it:

There are no rules!

But if you are like me and still want some advice- here are the tips I have gathered. Take them or leave them. Sometimes they work, sometimes not.

1. Mix different textures of bracelets.
2. Mix different styles (casual with dressy) and sizes.
3. Only wear on one arm.
4. Be careful with color- not too many colors, use contrasting colors, go monochromatic.
5. Notice the order- mixed up or smallest to largest?
6. Make sure they are comfortable and not distracting for you.
7. YOU like it!

There's a lot of conflicting advice from different sites. If you want links to where I found these "tips" check out my Pinboard.

If you are more of a visual person- here are some photos to inspire you.

The first four are from Kendi, my style icon.
I love the pop of blue against the warm colors of the outfit.

Some of the bloggers I read get too worked up about about being matchy-matchy. I think the matching bracelets and belt look beautiful.


This chromatic outfit looks so great with all the varying shades of blue and textures in the jewelry.

I like the gold, neutral bracelets against the brightness of the outfit. I think this is a great way to wear this trend without looking over the top.


Jentine at My Edit just barely did a post on thrifting this trend.


This example is from Rebecca with an R. I like the separation of the colors and the brightness of the bracelets against the muted shirt.

In this last example, Ana uses an eclectic mix of bracelets for a fabulous combo.


I don't own a huge variety of bracelets to have a go at this trend but this is one attempt I made. I am trying to slowly add to my collection. I made a few bracelets for bracelet week. I bought a great bangle for a good deal at Forever 21 the other day (can't find a photo on their website, sorry) and have been asking for bracelets for my birthday.

And... because my birthday is so darn close I am really REALLY tempted to order the above bracelets. Ack! I have already spent a lot of money this month! Just say no, Aubree!!!
Friday, July 1, 2011

Colorful Spiral Bracelet

Today's bracelet is so simple that you don't really even need a tutorial! But I will give you one anyway just so you can quickly see how to make this bright, fun bracelet.


You will need a package of wire that keeps it's shape like this. You can find it at any craft store.

You will also need a whole bunch of colorful seed beads.


Begin by turning one end of the wire into a loop with some jewelry making pliers.

At the other end, begin to string on the beads. And string and string and string....

When you reach the end, make another loop so the beads don't fall off.


And it's as simple as that! It will take a good amount of time to thread all the beads onto the wire, maybe an hour so. You can find bracelets like this for really cheap, but I had all the supplies on hand and the time to make one so I did.


I really love the trend I am seeing online of people wearing a lot of bracelets and a watch all on one hand. I want to do a post about this as part of this bracelet event.

I hope you are enjoying bracelet week! I know I haven't shown any out-of-this-world projects, but hopefully easy things that anyone can do to inexpensively increase the bracelets in their wardrobe.

Thursday, June 30, 2011

Anthropologie Strung Shapes Bracelet Tutorial

The next bracelet tutorial is another Anthropologie inspired bracelet that uses the same hemp technique as in the Terra Scintilla bracelet earlier this week.

Here is my bracelet-


This is the one from Anthropologie. This Strung Shapes bracelet retails at $88.

I made my bracelet using a medallion from an old broken necklace. You should be able to find a similar piece metal in the jewelry making section of a craft store.

The length of hemp that you need will depend on the size of the medallion and desired size of the bracelet. I used 2 pieces about 40 inces long for each side (4 pieces total).

Begin by looping the hemp through the whole in the metal ring. The now 4 ends of hemp should all be the same length.

Use this tutorial to learn how to make the knots, but instead of having a bangle bracelet as the middle piece, you will use two ends of hemp.


Braid the hemp until it reached the desired length to go about half way around your wrist. At the very end, attach a bead to the middle two strands and tie two more knots. Follow the instructions here for finishing off the end- tie it in a basic knot and glue before trimming.

For the middle two pieces, leave about 3 inches of the hemp before trimming it off.

Tie a knot at the end of these two pieces.

REPEAT ON THE OTHER SIDE

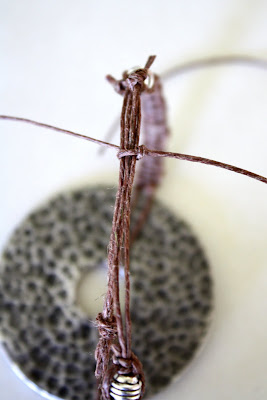
To make the "clasp" hold the two end pieces together as shown below.


Cut another piece of hemp about 12 inches long (better safe than sorry).

Start another knot, and continue until you have a series of knots about 1 inch long, using all of the bracelet end pieces as a center.

When you reach the end, tie a basic knot and glue the ends before trimming.

This small section (called a slider knot) should slide back and forth to make the bracelet adjustable.

And that's it! You can experiment with a variety of hemp colors, beads, metal shapes, etc. The Anthro bracelet used two different colors of hemp. There are a lot of possibilities!

Maybe my shape is a little too large... : )

Enjoy!

Wednesday, June 29, 2011

BONUS: Fireworks Bracelet

Because Bracelet Week is so close to the 4th of July I thought I would repost this project that I showed last year. there are a lot of new friends around here who may have not seen it. I call it the "Fireworks Bracelet." Enjoy! I will be back later today with another Anthropologie knock-off bracelet...


I LOVE the 4th of July! It is probably my favorite holiday. I am a history teacher so I love to celebrate the Founding Fathers, independence, and freedom. I go all out for the holiday. I decorate my yard and myself. I always go crazy with red, white, and blue. This bracelet is the perfect addition to my holiday- and can be for yours too!


Materials:
Plain chain bracelet (or make your own with chain and a clasp)
Headpins and/or eye pins
Red, white, blue, clear, and/or silver beads (gold would be pretty too)
Round nose and regular jewelry pliers
Wire cutters


Begin by arranging your beads on the headpins. The more random, the better.
Here are three examples of my headpins


Use the round-nose pliers to curve the end of the headpin.


Hook it on the chain of the bracelet.


Clip the end of the wire if necessary and close the loop with your jewelry pliers.


Now, add the rest of your headpins to the bracelet. The number of pins will depend on the size of your bracelet, the size of the links, and desired thickness. I used 1 or 2 pins per link depending on the size of the beads.


I call this the "Fireworks" bracelet because (obviously) it looks like a fireworks burst with the long skinny beads that stick out.


Here is a close-up view so you can see some of my other headpins.


Doesn't it look great? So fun for the 4th of July or any other patriotic holiday. It really can be worn all summer if you want. You could, of course, use this technique for any color and style of beads too!


I hope you are enjoying bracelet week. As I said above, come back later today for another tutorial.

Tuesday, June 28, 2011

The Chevron Bangle

Welcome to day 2 of Bracelet Week! Today's project is pretty simple, but a fun idea nonetheless. Chevron seem to be a trendy pattern right now so I made this cute chevron bangle.


Sorry about the quality of the photos. That is what you get when you craft in your yellow room in the basement at night... : (

Begin with a bunch of bangle bracelets. I used 6 small bracelets for this project. You also need 2 1/2 feet of ribbon. I found that for my size of bracelets that 3/8" wide ribbon worked best.


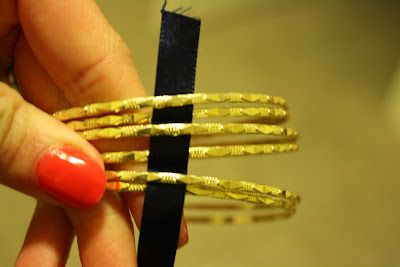
Begin by weaving the ribbon through the bracelets.

Pull it through until only a few inches of ribbon remain at the end.


Pull the ribbon down in a 'V' shape and weave the opposite direction.

Continue this pattern of weaving all the way around the bracelet, making sure to space the peaks of the 'V's evenly and not lose the tail at the end.

When you get to the end, make sure the end of the ribbon is pointing the same direction as the beginning of the ribbon so that you have a complete 'V' at the end.


Tie the ends of the ribbon into a bow. You will want to hold the edges of the ribbon over a candle to melt the edges to prevent fraying. You may also want to glue down the ribbon so that the bow doesn't come undone.

Very simple! Very quick! A quick trip to the store or a raid on your own jewelry box could have you a new bracelet in just minutes!


I used blue and gold because I am kind of into nautical right now. I would love to have one with silver bangles and orange ribbon. There are so many different color combos you can use to make it your own! Or customize it for gifts, holidays, or school colors!
Tomorrow, the bracelet will be another Anthropologie knock-off, PLUS a bonus bracelet in the morning. Come check it out!
 

©2011 All Rights Reserved | Website Designed by Website Design Credit

Powered by Blogger