Menu Home About Tutorials Style Shop Buttons

Thursday, June 30, 2011

Anthropologie Strung Shapes Bracelet Tutorial

The next bracelet tutorial is another Anthropologie inspired bracelet that uses the same hemp technique as in the Terra Scintilla bracelet earlier this week.

Here is my bracelet-


This is the one from Anthropologie. This Strung Shapes bracelet retails at $88.

I made my bracelet using a medallion from an old broken necklace. You should be able to find a similar piece metal in the jewelry making section of a craft store.

The length of hemp that you need will depend on the size of the medallion and desired size of the bracelet. I used 2 pieces about 40 inces long for each side (4 pieces total).

Begin by looping the hemp through the whole in the metal ring. The now 4 ends of hemp should all be the same length.

Use this tutorial to learn how to make the knots, but instead of having a bangle bracelet as the middle piece, you will use two ends of hemp.


Braid the hemp until it reached the desired length to go about half way around your wrist. At the very end, attach a bead to the middle two strands and tie two more knots. Follow the instructions here for finishing off the end- tie it in a basic knot and glue before trimming.

For the middle two pieces, leave about 3 inches of the hemp before trimming it off.

Tie a knot at the end of these two pieces.

REPEAT ON THE OTHER SIDE

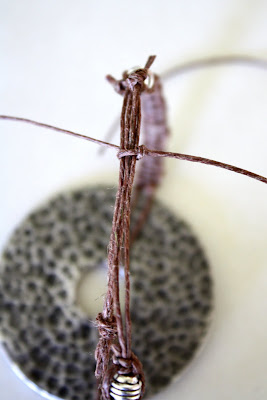
To make the "clasp" hold the two end pieces together as shown below.


Cut another piece of hemp about 12 inches long (better safe than sorry).

Start another knot, and continue until you have a series of knots about 1 inch long, using all of the bracelet end pieces as a center.

When you reach the end, tie a basic knot and glue the ends before trimming.

This small section (called a slider knot) should slide back and forth to make the bracelet adjustable.

And that's it! You can experiment with a variety of hemp colors, beads, metal shapes, etc. The Anthro bracelet used two different colors of hemp. There are a lot of possibilities!

Maybe my shape is a little too large... : )

Enjoy!

Wednesday, June 29, 2011

BONUS: Fireworks Bracelet

Because Bracelet Week is so close to the 4th of July I thought I would repost this project that I showed last year. there are a lot of new friends around here who may have not seen it. I call it the "Fireworks Bracelet." Enjoy! I will be back later today with another Anthropologie knock-off bracelet...


I LOVE the 4th of July! It is probably my favorite holiday. I am a history teacher so I love to celebrate the Founding Fathers, independence, and freedom. I go all out for the holiday. I decorate my yard and myself. I always go crazy with red, white, and blue. This bracelet is the perfect addition to my holiday- and can be for yours too!


Materials:
Plain chain bracelet (or make your own with chain and a clasp)
Headpins and/or eye pins
Red, white, blue, clear, and/or silver beads (gold would be pretty too)
Round nose and regular jewelry pliers
Wire cutters


Begin by arranging your beads on the headpins. The more random, the better.
Here are three examples of my headpins


Use the round-nose pliers to curve the end of the headpin.


Hook it on the chain of the bracelet.


Clip the end of the wire if necessary and close the loop with your jewelry pliers.


Now, add the rest of your headpins to the bracelet. The number of pins will depend on the size of your bracelet, the size of the links, and desired thickness. I used 1 or 2 pins per link depending on the size of the beads.


I call this the "Fireworks" bracelet because (obviously) it looks like a fireworks burst with the long skinny beads that stick out.


Here is a close-up view so you can see some of my other headpins.


Doesn't it look great? So fun for the 4th of July or any other patriotic holiday. It really can be worn all summer if you want. You could, of course, use this technique for any color and style of beads too!


I hope you are enjoying bracelet week. As I said above, come back later today for another tutorial.

Tuesday, June 28, 2011

The Chevron Bangle

Welcome to day 2 of Bracelet Week! Today's project is pretty simple, but a fun idea nonetheless. Chevron seem to be a trendy pattern right now so I made this cute chevron bangle.


Sorry about the quality of the photos. That is what you get when you craft in your yellow room in the basement at night... : (

Begin with a bunch of bangle bracelets. I used 6 small bracelets for this project. You also need 2 1/2 feet of ribbon. I found that for my size of bracelets that 3/8" wide ribbon worked best.


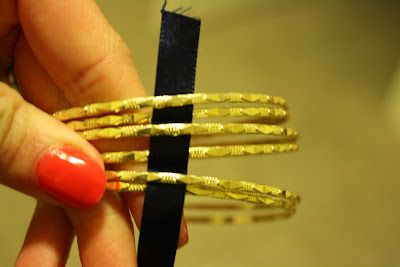
Begin by weaving the ribbon through the bracelets.

Pull it through until only a few inches of ribbon remain at the end.


Pull the ribbon down in a 'V' shape and weave the opposite direction.

Continue this pattern of weaving all the way around the bracelet, making sure to space the peaks of the 'V's evenly and not lose the tail at the end.

When you get to the end, make sure the end of the ribbon is pointing the same direction as the beginning of the ribbon so that you have a complete 'V' at the end.


Tie the ends of the ribbon into a bow. You will want to hold the edges of the ribbon over a candle to melt the edges to prevent fraying. You may also want to glue down the ribbon so that the bow doesn't come undone.

Very simple! Very quick! A quick trip to the store or a raid on your own jewelry box could have you a new bracelet in just minutes!


I used blue and gold because I am kind of into nautical right now. I would love to have one with silver bangles and orange ribbon. There are so many different color combos you can use to make it your own! Or customize it for gifts, holidays, or school colors!
Tomorrow, the bracelet will be another Anthropologie knock-off, PLUS a bonus bracelet in the morning. Come check it out!

Monday, June 27, 2011

Anthropologie Terra Scintilla Bracelet Knock-Off Tutorial

Welcome to bracelet week!
It's going to be great fun!

Our first bracelet this week is an Anthropologie inspired bracelet. Like the tutorial I did for the Accordion Strands necklace, this is a designer piece of jewelry that uses techniques I did as a child and have made for as long as I can remember.

Here are my bracelets:


This is the Anthro version:

While the colors are a bit different, mine looks just the same! The Terra Scintilla bracelet retails at $38 for two bracelets (although it does appear to be marked down). You can make your own for much, much less!

Materials:
Hemp
(get this colorful pack at a craft store, or find brown at Walmart)
Thin bangle bracelet
(any color will do- find large packs at Forver 21 or Walmart)
Jeweled trim
(I found it packaged in the jewelry section of a craft store)

If you can find a bracelet with the 4 jewels already attached, that would be a little easier to use. I looked and looked for one but had no luck.

Tools:
Ruler
Scissors
Strong glue such as E-6000


Cut four jewels from your trim. Follow the directions on the package of your glue to attach the jewels to the bracelet. Allow for the drying time specified for your glue. This will also work if the bracelet has a slight texture.

Cut 120 inches from your hemp. Find the middle and put it behind the bracelet. I like to start on the opposite side from the glued jewels.

Cross the left end of the hemp over the bracelet.

Cross the right end of the hemp over the left end.

Pull the right end under the bracelet and up through the loop on the left.

Pull it tight and you have your first knot.


Now, repeat on the other side. Cross the right end over the bracelet.

Cross the left end over the right piece.

Take the left end, pull it under the bracelet and up through the loop.

Pull it tight.

That's it! Now continue this process. Be sure to switch back and forth from left to right side with each knot. You can tell which side you are supposed to be on by looking at the last knot you did. Look at the photo below. See how the outside loop is on the right hand side? That means that my next knot will begin with the right side of the hemp.

Continue this process until you reach the jewels. Be sure to tie as many knots as you can so that the hemp is snug up against the first jewel.

Now, tie your next knot as described above, just go around the jewel.


For the size of my materials, I could fit two knots in between each jewel. Do as many as you can to make it a snug fit until you reach the end of the jewels.


Continue tying knots until you reach the beginning of the hemp. Again, fit as many knots to make it nice and tight. You will want to end on a knot that starts by crossing the right piece first so that you can't tell where the end is.


Bring the strings to the inside of the bracelet and tie one simple knot just like you are about to tie a bow. Put glue over the knot, wait for it to dry, and trim the ends of the string. DO NOT cut the ends off until you have finished the gluing process or your knot will come undone.

That's it! Now you have your own Terra Scintilla Bracelet.


Make some in all different colors!


This is a really fun project, but can be a lot of materials to buy (and money to invest) if you only want to make one or two bracelets. To help you out, I have created "Anthropologie Inspired Bracelet Kits" for sale in my Etsy shop.

For $2.50, your kit includes one bangle bracelet, 120" of hemp in your choice of color, and a piece of trim with four jewels

Buy a kit to make two bracelets for $4.50.


You can also buy the finished bracelet in your choice of colors 1 for $9.50 or 2 for $18.

If any of the listings appear to be sold out, let me know and I can set up a custom order for you!

Please don't hesitate to ask questions! It takes just a minute to catch on to the process, but once you have got it- it's pretty simple. I taught my teenage nieces how to make these the other day and they were able to pick up on it really fast.

Good luck and have fun!


©2011 All Rights Reserved | Website Designed by Website Design Credit

Powered by Blogger