Monday, June 28, 2010

The Wedding Dinner

First off, thanks so much for the wonderful reception to my Fireworks Bracelet tutorial! I am so happy to see so many positive comments. Also, a big hello and welcome to the new readers who have joined Yellow Blackbird recently!


Well, the wedding that I have been blogging about for weeks is finally over! I am going to tell you all about the wedding dinner today, and then do a post about the reception later this week. This was my little brother's wedding.

First, I want to show you these cute favor boxes that my mom and I made. I took pictures as I was making them so I could do more of a tutorial post, but they disappeared and I have no idea why. But luckily it is a very simple process, ha ha:


1. Buy some boxes from Walmart

2. Fold boxes

3. Make roses

4. Insert tissue paper and chocolate in boxes

5. Attach ribbon and rose to box (I used hot glue)

6. Display on table! : )


Anyway, I think the boxes really added to the table. The center pieces arranged by my mom were so pretty, but the roses just tied it all together.


My mom used laterns and candles for the center pieces (we always use battery powered candles because of my dad's asthma). She purchased these frames at the dollar store and put pictures of the bride and groom as children in them. (No, we did not marry my kid brother off. This is a picture of him from junior high, I think.) The flowers also look really pretty. We matched them to the paper to make the roses.


For the head table, my mom used a larger lantern and doubled the display with a more recent photo of the bride and the groom.


My mom purchased the tablecloths so she went with a neutral color so they could be reused. We borrowed plates from my mother-in-law that had been used at my wedding, borrowed the goblets, and used nice looking but plastic silverware.


At first I was iffy about the black napkins, but I think they look really nice.


This is a view of the entire room. We were able to rent a nice clubhouse near my parents home that made it so convenient.


Here is a picture of my cute husband and me at the dinner. I was so excited to wear this dress I snagged at Target, but then everyone else wore black and looked really classy and I felt like a clown. : ) Oh well, at least I still have the fun dress for other occasions.


I hope soon to do a post about the necklace. It was origionally purchased from Old Navy, but then altered by me!


Have a wonderful day!
Thursday, June 24, 2010

Watches for Grandma


Last week my grandma bought some watch faces and beads so that I could make her some watches. I wanted to share the pictures because I think they are so pretty! I love working with beads that others choose because it usually isn't a combination I would choose.

I never would have thought to use gold hardware with a copper watch face. But by including gold beads it ties everything together. I LOOOOOVE it!


This watch is also gorgeous. I love the gold and pearls together!


These watch faces and beads can be purchased at Robert's Craft if you have one in your area.


I hope this inspires you to combine colors and make unexpected designs. You might just love what you get!


Tuesday, June 22, 2010

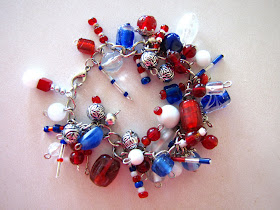
The Fireworks Bracelet Tutorial


I LOVE the 4th of July! It is probably my favorite holiday. I am a history teacher so I love to celebrate the Founding Fathers, independence, and freedom. I go all out for the holiday. I decorate my yard and myself. I always go crazy with red, white, and blue. This bracelet is the perfect addition to my holiday- and can be for yours too!


Materials:
Plain chain bracelet (or make your own with chain and a clasp)
Headpins and/or eye pins
Red, white, blue, clear, and/or silver beads (gold would be pretty too)
Round nose and regular jewelry pliers
Wire cutters


Begin by arranging your beads on the headpins. The more random, the better.
Here are three examples of my headpins


Use the round-nose pliers to curve the end of the headpin.


Hook it on the chain of the bracelet.


Clip the end of the wire if necessary and close the loop with your jewelry pliers.


Now, add the rest of your headpins to the bracelet. The number of pins will depend on the size of your bracelet, the size of the links, and desired thickness. I used 1 or 2 pins per link depending on the size of the beads.


I call this the "Fireworks" bracelet because (obviously) it looks like a fireworks burst with the long skinny beads that stick out.


Here is a close-up view so you can see some of my other headpins.


Doesn't it look great? So fun for the 4th of July or any other patriotic holiday. It really can be worn all summer if you want.


If you make one, I would love to see it!


In addition to my fav linky parties listed on the sidebar, this project will be linked up to:

http://todayscreativeblog.blogspot.com/
http://mybackyardeden.blogspot.com/


MuralMaker and More


make it wear it


Monday, June 21, 2010

Refashion #2 (Simple t-shirt makeover)

I have finally got around to trying another refashion project! I have had this shirt for years. I think it's cute, but boring. I needed to add something to make it a little more fashionable and fun.
First, I cut out three circles of some polyester lining fabric. They are about 2 inches, but I ended up cutting them down later so just experiment and see what size works for you.


Gather each circle by pinching the center of the circle to form petals.


Pinch the center of the othe two circles and add them to the bunch.


If you want a larger or smaller bloom just add or subtract the number of circles.
Stitch the circles together at the bottom several times and several directions until it forms a nice bloom.


Cut off the bottom of the bloom to create a flat edge (instead of a pointed one).


Stitch it to your shirt. (You could probably also glue it if you wanted.)
Doesn't the shirt look better already?

I added different numbers of circles to make clusters and stiched them on the shirt until I was satisfied with the amount of ruffle.
Ta da!!
It is very simple, but I think it adds a lot to the shirt! : )


Check out my first refashion here.
I have a fun 4th of July jewelry project coming up later this week so stay tuned!
My brother's wedding is this week too, so this weekend or beginning of next week I should have pictures of the bridesmaid belts with the dresses and another paper flower project we are using at the wedding dinner.
Thanks for reading!!
In addition to my favorite linky parites listed in the right sidebar, this post will be linked up to the following sites:

Thursday, June 17, 2010

Altered Picture Frames (and of course a monogram letter)

As I have mentioned several times already, my brother is getting married soon. I already showed his fiancee's bridal shower and gift, but my mom and I were invited to another shower for her. I wanted to make something for the first gift but didn't have time. I was glad to have a chance to make some home decor and give to her.


I purchased 3 plain wood frames at Dollar Tree. I painted each frame black. For this frame I created the very popular singed flower and added a metal "happily ever after" charm.


I decoupaged patterned paper on to the next frame. I added the ribbon over the part that wasn't perfect. : ) I cut the back off a button and glued it on.


I added red stickers to this frame and then put a coat of Mod Podge over it.


Of course I also have to throw in a matching monogram wood letter!


I think they will look great all in a group or individually.


I sure hope she liked them! : )


Wednesday, June 16, 2010

Bridesmaid Belts

I made these belts for my brother's upcoming wedding. They are for the bridesmaids dresses which are a really pretty shade of orange. The wedding colors are orange and hot pink.

I am so pleased with how they turned out! I think they are so pretty! And I am one of the bridesmaids so I get to wear one!

I used about 2 yards of ribbon to allow for a bow, but we didn't want the ribbon to hang too far down in the back.


This isn't a great shot because I took it of myself. But I did want to show you how the belt looked worn. Here, I just have it over a simple black cardigan. The wedding is next week and I will take a picture of the belt and dress together to share.


I made extra hot pink flowers for hair clips or pins. You can pick one up for yourself here. : )
If you are interested in ordering custom belts for your own wedding or special event contact me at aubs25@hotmail.com or through my Etsy shop!
Coming up soon on Yellow Blackbird:
-Altered picture frames
-A simple t-shirt refashion
-"Magical" June cards
-Shop monogram letters
Have a wonderful day!
-Aubree